Stage 7 - Animation, Screenshake, & Sounds
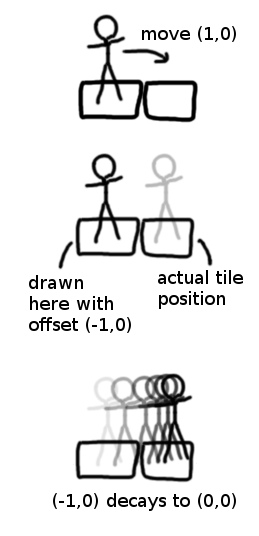
Turn based movement without animation is not only a bit boring, but it also makes deciphering gameplay difficult. Monsters jump all over the screen and it's impossible to tell exactly what's happening.Luckily, smoothing turn based movement is a piece of cake. When a monster moves from one tile to another, we start out by drawing them immediately in the new tile BUT with an
offsetXoffsetYEach frame, we reduce the offsets and in doing so, the sprites slide into place. When the offsets reach 0, sprites appear precisely at the their actual position.
monster.js
...Let's start adding in those offsets.
monster.js
getDisplayXgetDisplayYxyNow here's the magic, the code that actually animates these offsets:
monster.js
During each draw call, we're reducing the value of the offsets by one eigth of a tile, which is what produces the sliding animation.
Math.sign()Something interesting to note here is this actually won't work with a value like 0.1 instead of 0.125 (i.e. 1/8) because of floating point math. If you type
0.1 + 0.1 + 0.10.30.30000000000000004Bump attack
With that, basic animation between tiles is in place. And just two extra lines can add a bump attack animation.monster.js
Screenshake
Screenshake uses a similar concept to offset animation: draw things in their proper place and then just tack on some additional offsets. And also reduce the value of those offsets every frame until they're 0 (the screenshake should quickly fade out).In the case of screenshake, the offsets are random and they will apply to everything on screen. This lets us do our screenshake offset in a single place:
drawSpriteWe'll start out declaring a
shakeAmountshakeXshakeYindex.html
monster.js
The part that actually affects what you see is here in
drawSpritedrawImageshakeXshakeYThen we'll add a new
screenshakeshakeAmountgame.js
...shakeAmountfalsetrueThe next part uses some basic trigonometry. A quick refresher in case you forgot your trig classes: if you provide an angle, cosine will tell you big the X component is and sine will tell you how big the Y component is. Our JavaScript trig functions deal in radians instead of degrees, which is why we'll be referencing
Math.PI*2We select a random
shakeAngleMath.cosMath.sinshakeAmountroundOur screenshake is pretty subtle, but for fun try setting the
shakeAmountSounds
To really polish things up, we need sound!We're going to make 5 sounds, from scratch:
- hit1.wav: when the player hits a monster
- hit2:wav: when a monster hits the player
- treasure.wav: when the player picks up a treasure
- newLevel.wav: when the player exits a level
- spell.wav: when a player casts a spell
To make our sounds, we're going to use a tool called Bfxr.
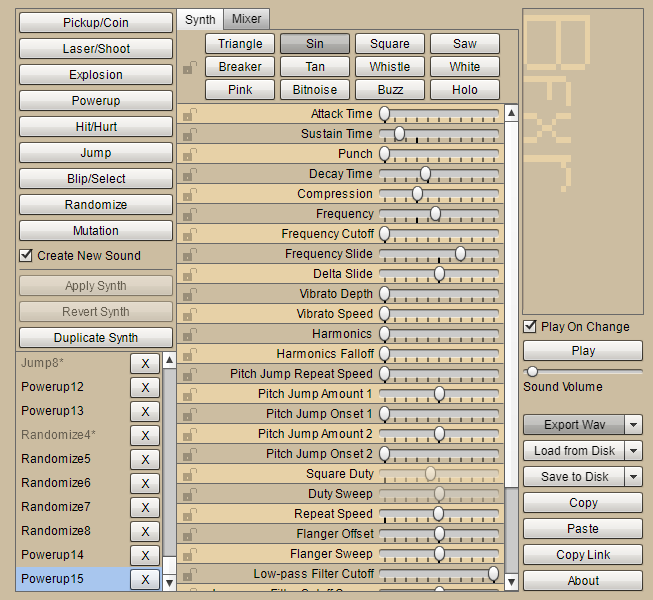 Now this might look an overwhelming monstrousity (audio software always is). But I promise it's the easiest game development tool I've ever used and creating very nice sounds can be done in a couple button clicks.
First navigate to bfxr.net. You might have to fiddle around with your Flash settings to get it to launch.
Really all you need to do is click one of the buttons in the upper left. The rest of the UI is for tweaking those sounds further, but that's optional. Our first sound "hit1.wav" can be generated with the Hit/Hurt button. We can continue to click that button to generate new sounds until we get one we like. You'll also find the buttons Powerup and Jump useful for the other types of sounds we want to generate.
If you want to try out some customization options, the easiest one to start would be Mutation which mutates your current sound randomly. Selecting different synths is also pretty straightforward. I find Sin to be the softest option and it's great for soothing electronic noises like boops and beeps. White is great for static and rough sounding noises like explosions.
After you're done, simply select Export Wav, name the file according to our naming scheme shown earlier, and save it into our project under a "sounds" folder.
Generate the 5 sounds and then we'll get back into coding.
To play audio in the browser we use the
Now this might look an overwhelming monstrousity (audio software always is). But I promise it's the easiest game development tool I've ever used and creating very nice sounds can be done in a couple button clicks.
First navigate to bfxr.net. You might have to fiddle around with your Flash settings to get it to launch.
Really all you need to do is click one of the buttons in the upper left. The rest of the UI is for tweaking those sounds further, but that's optional. Our first sound "hit1.wav" can be generated with the Hit/Hurt button. We can continue to click that button to generate new sounds until we get one we like. You'll also find the buttons Powerup and Jump useful for the other types of sounds we want to generate.
If you want to try out some customization options, the easiest one to start would be Mutation which mutates your current sound randomly. Selecting different synths is also pretty straightforward. I find Sin to be the softest option and it's great for soothing electronic noises like boops and beeps. White is great for static and rough sounding noises like explosions.
After you're done, simply select Export Wav, name the file according to our naming scheme shown earlier, and save it into our project under a "sounds" folder.
Generate the 5 sounds and then we'll get back into coding.
AudioAudioplayindex.html
game.js
initSoundssoundsplaySoundcurrentTimeNow let's call
playSoundmonster.js
tile.js
... For our last addition, we'll add spells in the next section.